How to import Checks to QuickBooks Online
This guide will uncover how to import Checks into QuickBooksⓇ Online using Business Importer Online.
Overview:
Importing Checks into QuickBooks Online
Here are the steps of how to export your data from PayPal in order to import it in QuickBooks Online (QBO).
To import Checks expenses into QuickBooks Online, please follow these simple steps:
1. Sign in to Business Importer (from your Apps section in QuickBooks left hand side menu) and connect it to your QuickBooks company.
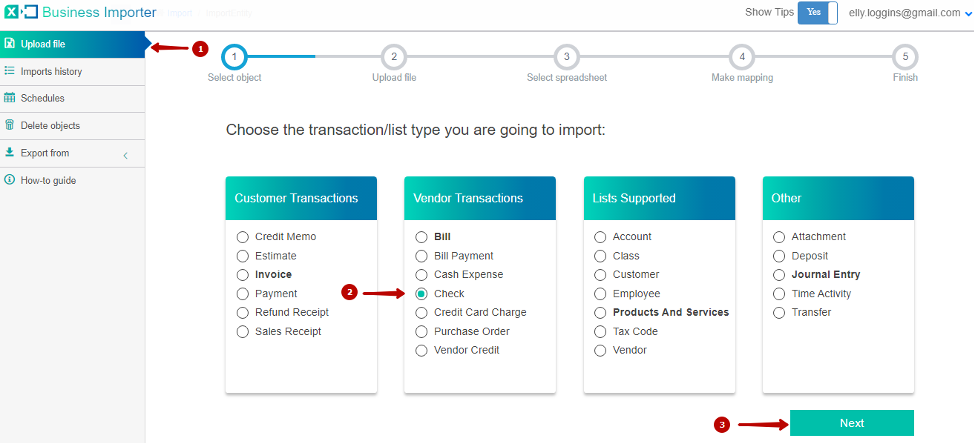
2. Go to Upload file tab and select Check entity. Click on the Next button.
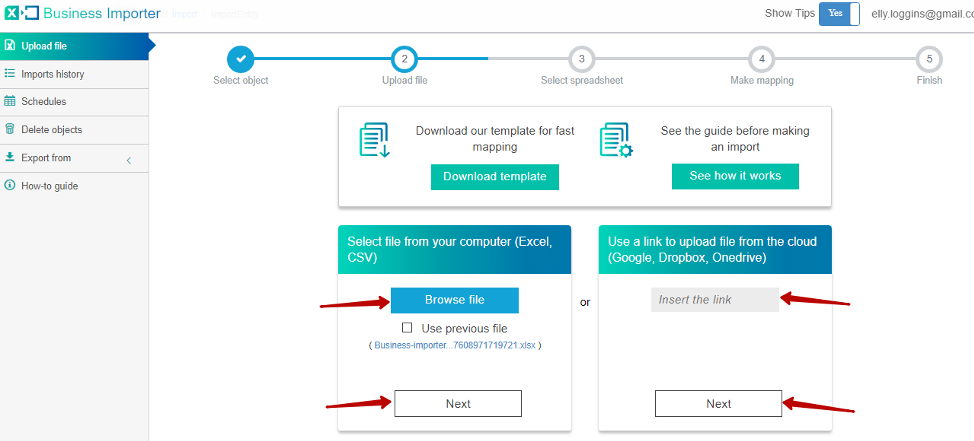
3. Press Browse file to choose file from your computer or you can put the link into “Insert the link” field if you want to upload file from Google Sheets, DropBox or Microsoft OneDrive link. Press Next.
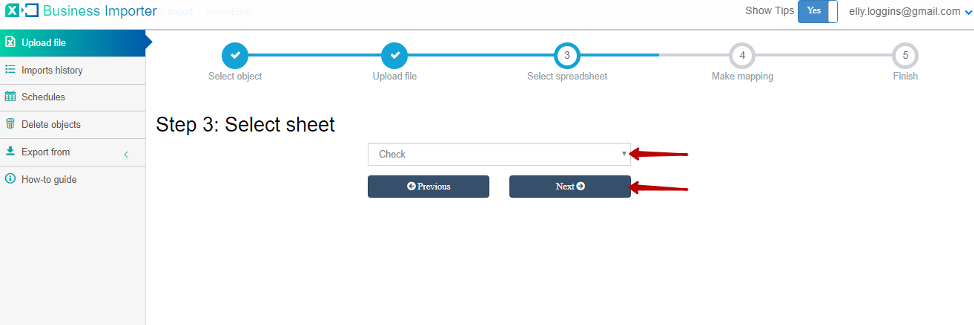
4. Select sheet with your Check data (in case you have several sheets) and press next.
5. Select Company you want to import to and connect Provider labels (which are fields from your QuickBooks) to Your Labels (which are heading of the columns from your import spreadsheet). If you need help with mapping please click on the blue Mapping Helper on the right of the screen (see below).
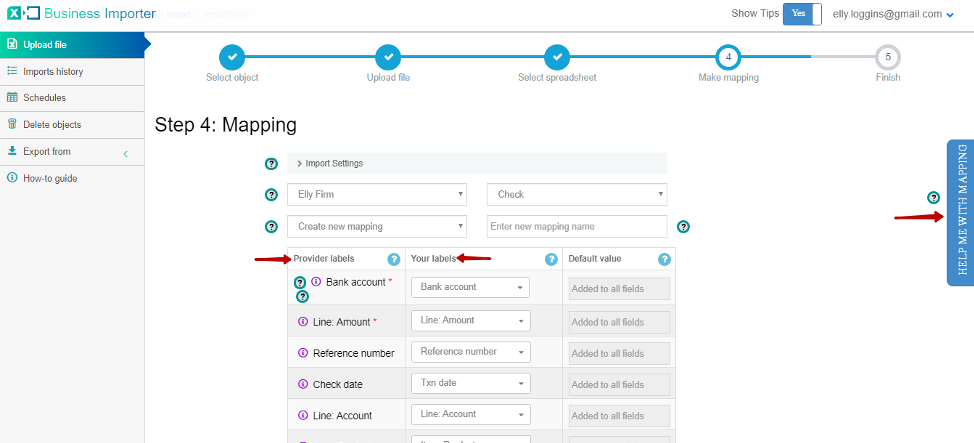
*Important Notes for your Checks mapping:
Bank Account – Bank account field is required, so make sure this column is filled in for each line of the check.
Line: Account – this is a field where you are to specify the category for your expense. If this is a new Account in your QuickBooks Online, create a new Expense account in your QuickBooks Online account before starting import OR enable account auto creation for account in the Business Importer settings.
PrintStatus – Valid values: “NotSet”, “NeedToPrint”, “PrintComplete”.
Line: Billable status – Valid values: “Billable”, “NotBillable”, “HasBeenBilled”.
“Name” and “Type” fields – Name and Type fields are needed for creation of the check payee in your QuickBooks by the app (in case you do not have them already in your QuickBooks). Make sure you specify the name of the payee in the column mapped to Name, and the type of the name (”Customer”, “Vendor”, “Employee”) in the column mapped to Type field.
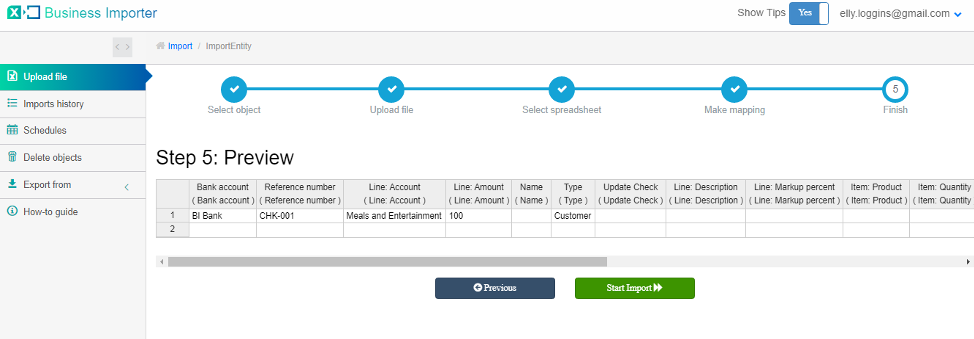
6. Press Next button in the bottom of the screen to see a preview of your Checks, then press Start Import button.
7. Congratulations, you have uploaded your checks successfully.
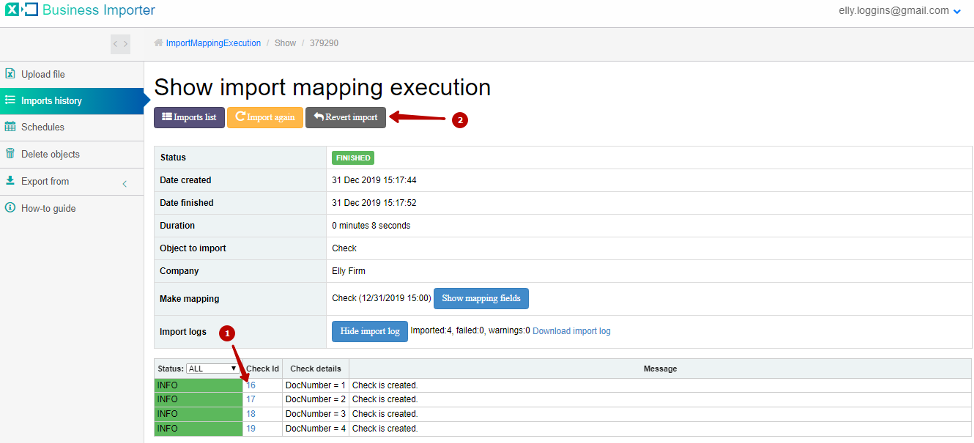
Press ID number (1) to see your uploaded Checks on QuickBooks side. Press Revert button (2) to cancel any Check on QuickBooks side created by current upload.
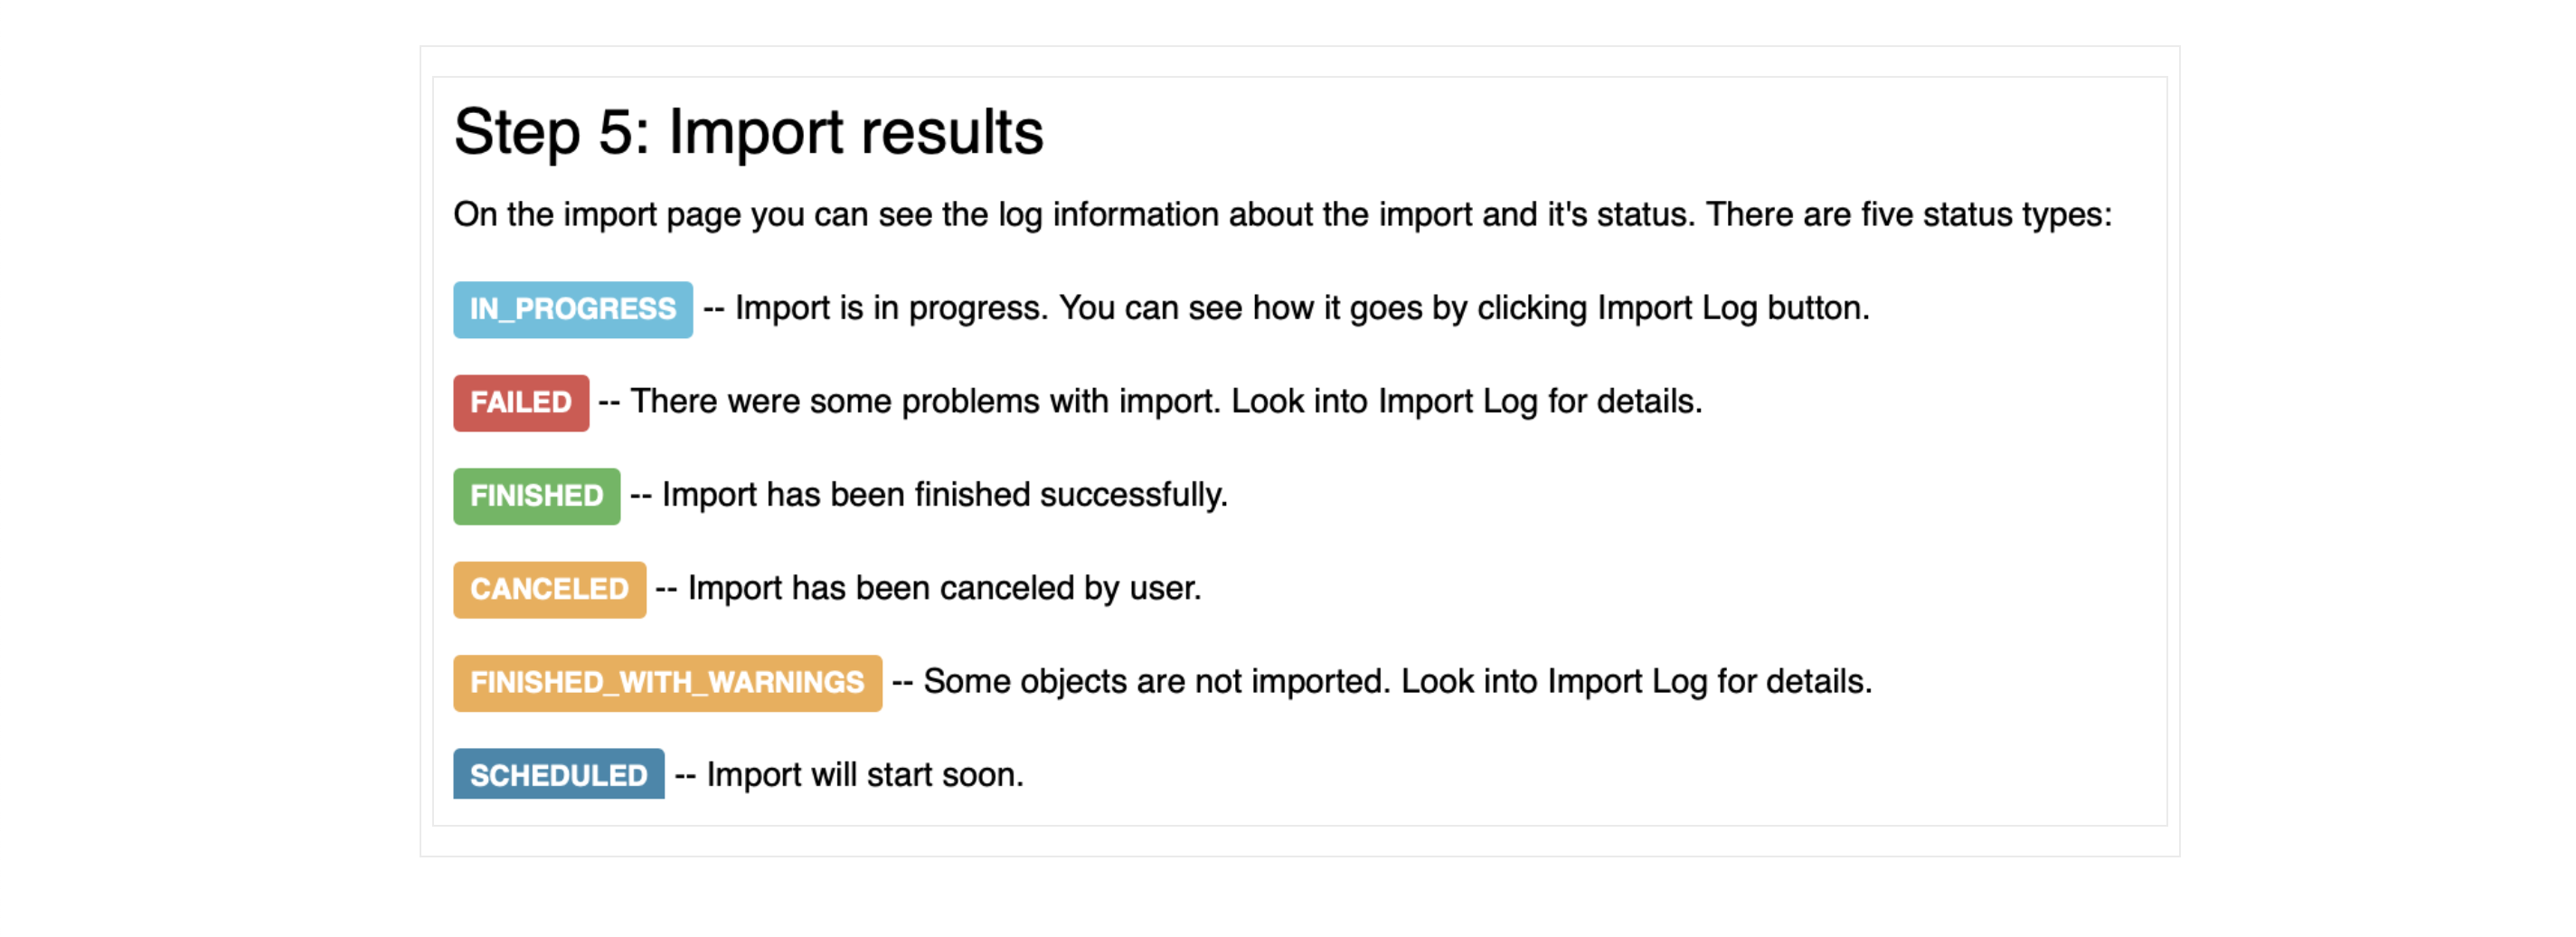
There are 5 types of import results.
The most common errors and ways to solve them
There are 7 most common errors made by our clients when they import Checks into QuickBooks online. To prevent this happening, we have reviewed all of them and given solutions below.
| Problem | Error occurs | Solution | Correct example |
|---|---|---|---|
| Wrong date format is used. | WARNING Error parsing date 01-14-2015. : Expected format currently MM/dd/yyyy, but you can change it on your profile page. | Change date format to MM/dd/yyyy. | 01/14/2015 |
| You haven’t got an account (Bank Account) with this name in your QuickBooks Online account. | ERROR Purchase CHK-001: CP: Account with Name = “BI Bank” is not found in your QuickBooks Online account (‘s Company). | Create a Bank Account with this name in your QuickBooks Online. | Southside-bank Of America |
| You haven’t got an account (Expense account ) with this name in your QuickBooks Online account. | Account with Name = “Meals and Entertainment” is not found in your QuickBooks Online account (‘s Company).
Or Required parameter Line.AccountBasedExpenseLineDetail.AccountRef: is missing in the request. |
Create an Expense Account with this name in your QuickBooks Online account. | Meals and Entertainment |
| Invalid Currency code | ERROR Purchase PUR-002: Invalid or Unsupported currency type supplied. Supplied value:US. | Specify Currency code (CurrencyRef) . Choose letters according to ISO 4217. For example, USD, EUR, CAD, GBP. | USD |
| Duplicated number of Check | ERROR Purchase PUR-003: Duplicate Document Number Error You must specify a different number. This number has already been used. | Please, write a new number of Check.
Or |
PUR-021 |
| Wrong Print status | ERROR Purchase PUR-024: Property Name:Can not construct instance of com.intuit.schema.finance.v3.PrintSt specified is unsupported or invalid. | Valid values: NotSet, NeedToPrint, PrintComplete. | NeedToPrint |
| Wrong Billable status | ERROR Purchase PUR-026: Property Name:Can not construct instance of com.intuit.schema.finance.v3.BillableSt specified is unsupported or invalid. | The billable status of the expense. Valid values: Billable, NotBillable, HasBeenBilled | Billable |
Useful tips on how to work with your transactions with Business Importer
1. You can delete transactions from QuickBooks Online with the help of our app. Check this guide to know how to do it.
2. Another useful option of Business Importer Online is that you can schedule your imports.
3. Check will show up as Expense on the QuickBooks end, as well as Credit Card Charge and Cash Expense.
Supported Check fields and their description in QuickBooks Online
Here is a useful guide that will help you to prepare your Excel file and create correct mapping:
| QuickBooks Field | Business Importer Name | Description | Example |
|---|---|---|---|
| DocNumber | Reference number | Reference number for the transaction. | PUR-001 |
| TxnDate | Txn date | The date entered by the user when this transaction occurred. Default date format is dd/MM/yyyy. You can change it on Settings page. | 09/20/2015 |
| PrivateNote | Private note | User entered, organization-private note about the transaction. | |
| DepartmentRef | Department | Location of the transaction, as defined using location tracking in QuickBooks Online. Please, provide only its name. | |
| TxnTaxDetail.TotalTax | Total tax | Total tax for the transaction. | 1524.02 |
| AccountRef | Bank account | Required. Specifies the account name or number. Check should have bank account, CreditCard should specify credit card account. Please, provide only its name or number. | Checking |
| EntityRef.type | Type | Specifies the party type with whom an expense is associated. Can be Customer, Vendor, Employee. | Customer |
| EntityRef.name | Name | Specifies the party with whom an expense is associated. Please, provide only its name. | Cool Cars |
| TxnSource | Txn source | Used internally to specify originating source of a credit card transaction. | |
| PaymentMethodRef | Payment method | Name of Payment method | |
| GlobalTaxCalculation | Global tax calculation | Method in which tax is applied. Allowed values are: TaxExcluded, TaxInclusive, and NotApplicable. | TaxExcluded |
| PrintStatus | Print status | PrintStatus is applicable only for Check. Ignored for CreditCardcharge or refund. Valid values: NotSet, NeedToPrint, PrintComplete. |
NeedToPrint |
| Line | Line: Description | Free form text description of the line item that appears in the printed record. Maximum of 4000 characters. | |
| Line: Amount | The amount of the line item. | 1234.50 | |
| Line: Customer | Name of the Customer associated with the expense. Please, provide only its name. | ||
| Line: Class | Reference to the Class associated with the expense. Please, provide only its name. | ||
| Line: Account | Name of the Expense account associated with the service/non-sellable-item billing. Please, provide only its name or number. | ||
| Line: Billable status | The billable status of the expense. Valid values: Billable, NotBillable, HasBeenBilled | Billable | |
| Line: Tax code | The TaxCodeassociated with the sales tax for the expense. Please, provide only its name. | ||
| Line: Tax amount | Sales tax paid as part of the expense. | 1251.02 |
Remember: if you have any questions you can address them to us. We’ll be glad to help you!
Just leave us a message filling out our contact form or use the phone/email mentioned in the footer of every page.
Comments open